Using an Ingress to add authentication and authorization to Workflow applications
This document describes how you add an Ingress to a SonataFlow workflow to handle authentication and authorization use cases.
In the approach outlined in this guide, protect your workflows from anonymous access outside the cluster with the OpenID Connect specification.
Although the example demonstrated in this document is not meant to be used in production, you can use it as a reference to create your own architecture.
Architecture
The following image illustrates a simplified architecture view of the recommended approach for protecting SonataFlow workflow endpoints.
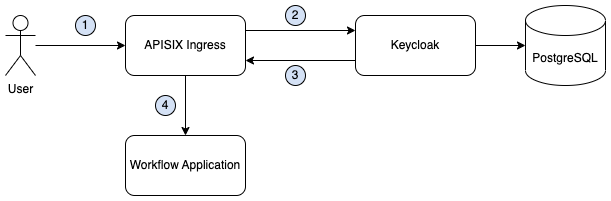
-
User makes a request with their credentials
-
APISIX do the JWT token introspection in the OIDC Server (Keycloak)
-
Keycloak validates the token
-
APISIX forwards the request to the workflow application
This is a simplified approach for OIDC (OpenID Connect protocol) use cases. In production environments, you can tailor your gateway and OIDC server to meet your requirements and scope.
|
This approach only protects the communication via Ingress. Direct calls to the workflow application internal service would be anonymous. For example, another microservice in the cluster making requests to the workflow internal service. Set Kuberbetes NetworkPolicies to your workflow applications if this is not the desired behavior. |
How to deploy the example architecture
The following sections describe how to deploy the example architecture using APISIX and Keycloak to protect your SonataFlow workflows.
-
Minikube is installed. You can use Kind or any other cluster if you have admin access. Just ensure to adapt the steps below to your environment.
-
Clone the example SonataFlow APISIX with Keycloak in a local directory.
-
(Optional) SonataFlow Operator is installed if you are going to deploy via the operator.
-
(Optional) Quarkus SonataFlow workflow is deployed if you are not using the operator.
Installing Keycloak
From the example’s cloned directory 'sonataflow-apisix-oidc', run the following command:
kubectl create ns keycloak
kubectl kustomize manifests/bases | kubectl apply -f - -n keycloak
This command creates a namespace called keycloak and a Keycloak server deployment connected to a PostgreSQL database to persist your data across cluster restarts.
Exposing Keycloak locally
|
You can skip this section if you are running on OpenShift or any cluster that you can expose Keycloak via an Ingress DNS or Route. |
Since Keycloak is running on Minikube, expose the service port to your local network by running the following command:
kubectl port-forward $(kubectl get pods -l app=keycloak --output=jsonpath='{.items[*].metadata.name}' -n keycloak) 8080:8080 -n keycloakFrom now on, every connection to the 8080 port is forwarded to the Keycloak service endpoint.
The next step is to configure your local /etc/hosts. This step is needed because the token you are going to generate must come from the same URL that the APISIX server introspects once you access the workflow.
Edit your local /etc/hosts file and add the following line:
127.0.0.1 keycloak.keycloak.svc.cluster.localYou can try accessing your Keycloak admin console in the address http://keycloak.keycloak.svc.cluster.local:8080. The default user and password are admin.
|
In real-life environments, this step is not needed since Keycloak or any OIDC server is served by a load balancer with the correct address configured. |
Configuring the Keycloak OIDC Server
In the next step, log in to the Keycloak admin console in the address http://keycloak.keycloak.svc.cluster.local:8080 using the default credentials.
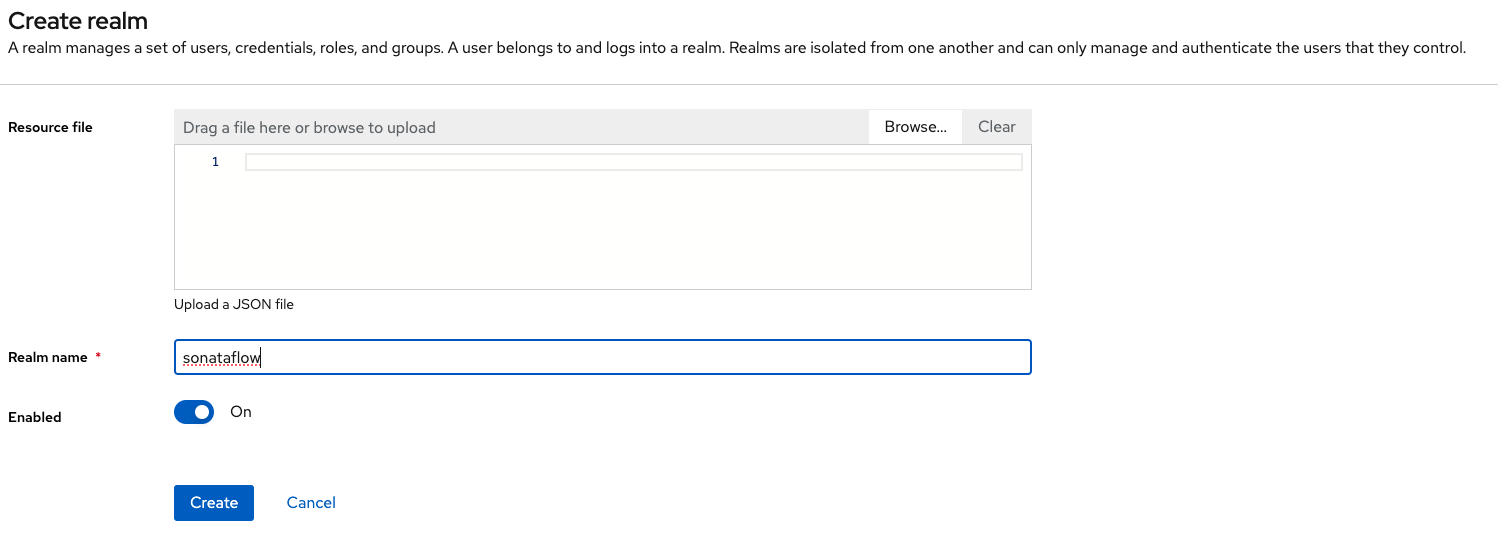
Once you are logged into the console, click Create realm in the top left menu. In this screen, create a new realm named sonataflow. See the image below for more details:
Next, create a client for the APISIX Ingress to introspect the JWT tokens.
In the left menu, make sure that you are in the sonataflow realm and click on Clients, then Create client. Give the name apisix-ingress and then click on Next.
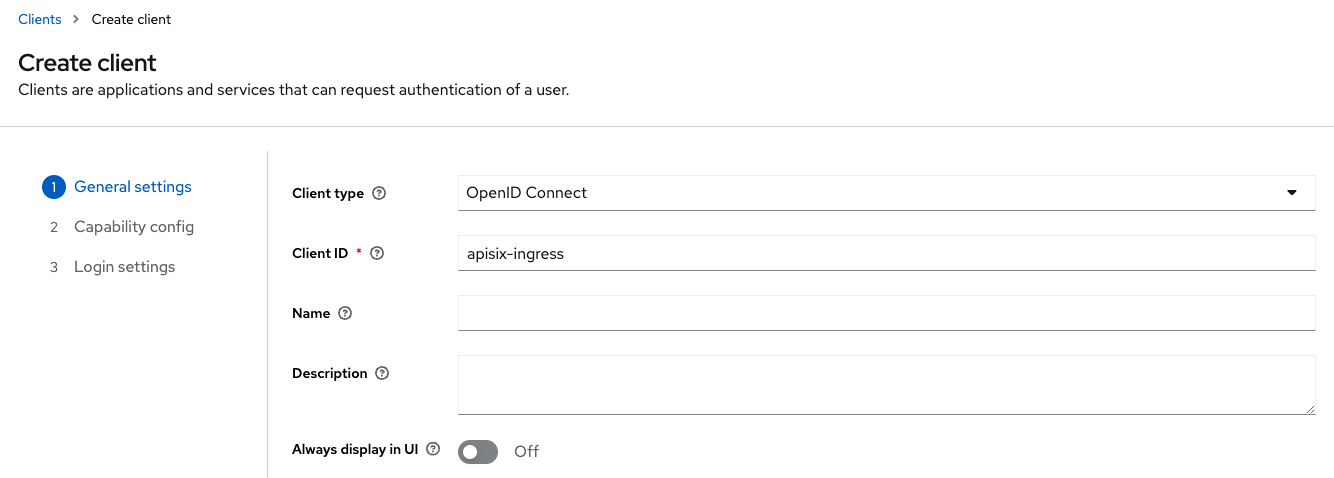
Next, add the details about this client:
-
Turn the Client authentication option on.
-
Leave Authorization off.
-
Mark the options Standard flow and Direct access grants and leave the rest blank.
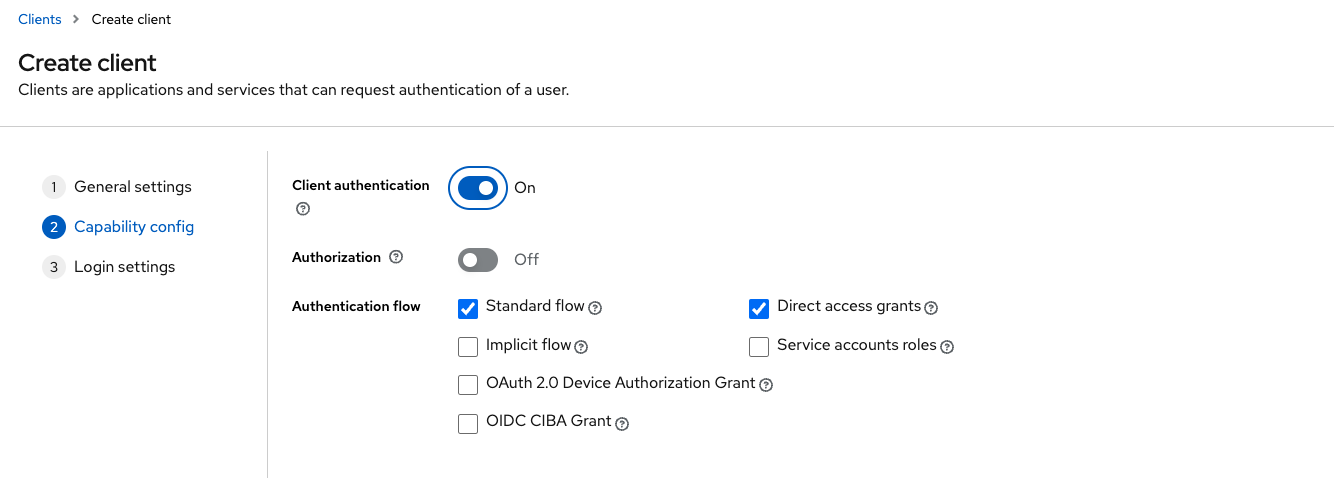
Click on Next, leave everything blank in the next screen and click on Save.
Creating a user
In this example, create a user registered in the Keycloak server to access the workflow application.
|
For simplicity, use the Grant Type Resource Owner Password. This flow is not recommended for production architectures. Consider using other mechanisms such as Authorization Code or Client Credentials. |
In the left menu, make sure that you are in the sonataflow realm and click on Users and then click Create new user.
In this screen, fill in the details according to the figure below:
-
Switch Email verified option on.
-
Set Username to
luke. -
Set Email to
luke@republic.org -
Set First name to
Lukeand Last name toSkywalker
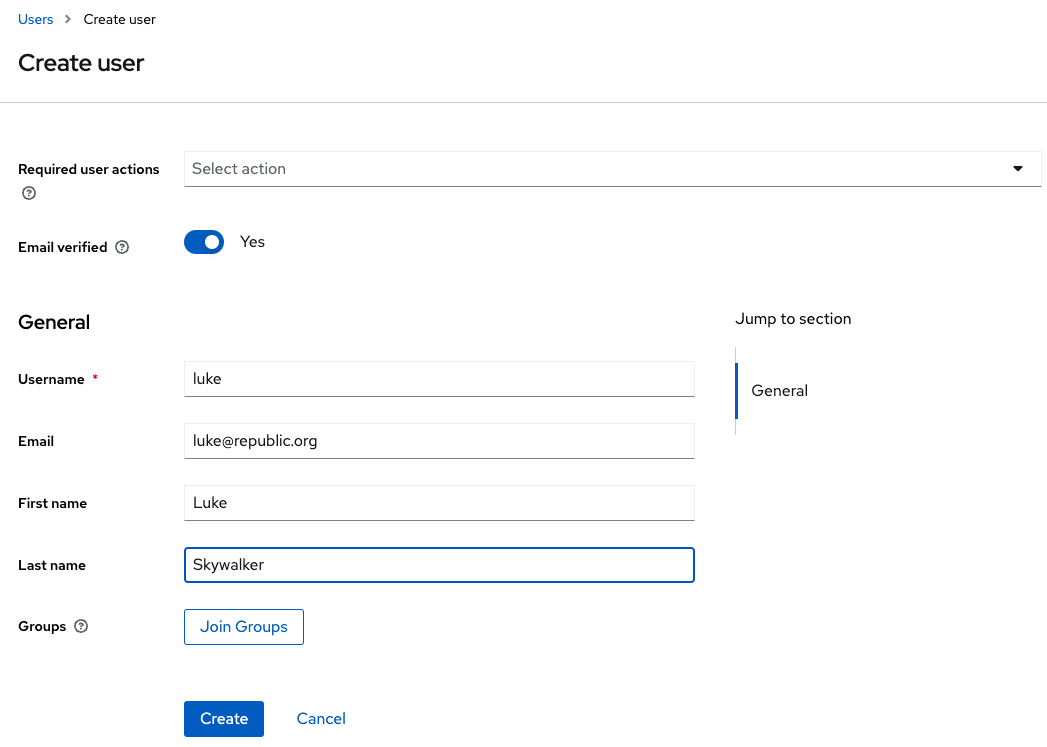
Click on Create.
Next, set the credentials for this newly created user. Click on Users in the left menu and then in the name luke.
In this screen, click on the tab Credentials, and then on Set password.
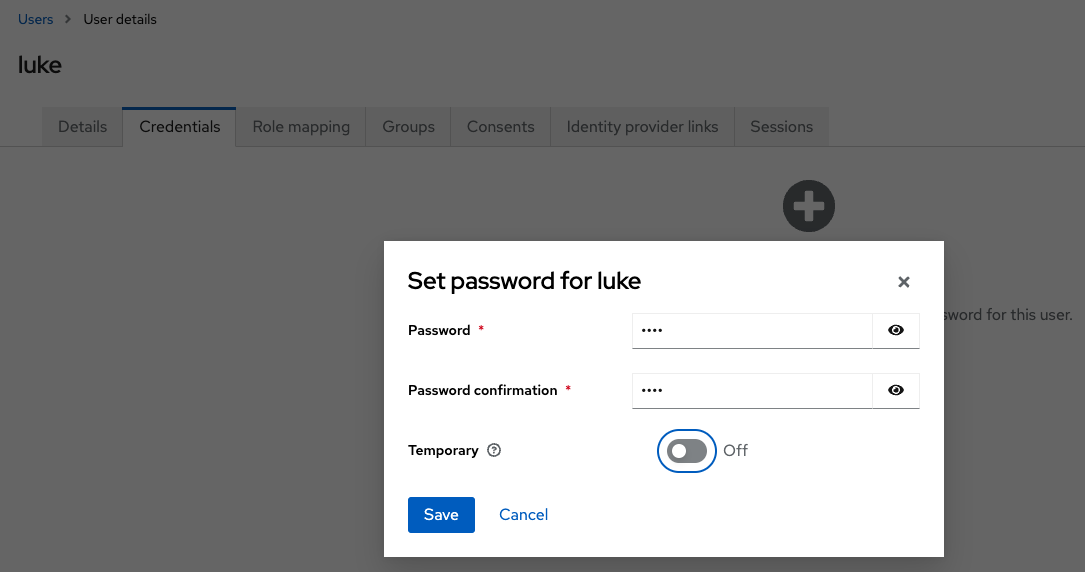
Set the password as luke (same as the username), leave the Temporary option off and click on Save.
Use the credentials luke/luke later in this guide to acquire a JWT token to make requests to the workflow application.
Installing the APISIX Ingress
Follow the documentation on APISIX Documentation website and install the APISIX Ingress in your cluster (install the HELM client first).
If you are running on Minikube, expose the APISIX Ingress server:
minikube service apisix-gateway --url -n ingress-apisixThe command outcome is the local URL which you can access the Ingress you create later in this guide. Leave the terminal open.
|
If you are not running on Minikube, see the APISIX Ingress documentation for more information on how to expose the Ingress already in your cluster. |
After this step, Keycloak OIDC Server and APISIX Ingress Controller on your cluster are able to protect your SonataFlow workflow applications from external requests.
Deploying the SonataFlow sample workflow
In this section, learn how to deploy the Greeting workflow example and a custom APIXSIX Ingress to protect external requests to the application’s endpoints.
-
You installed, configured, and exposed the Keycloak server
-
You installed and exposed the APISIX Ingress server
-
You installed the SonataFlow Operator
The first step is to deploy the SonataFlow workflow.
Enter the example project directory that you cloned locally and run the command below:
kubectl create ns sonataflow
kubectl apply -f workflow-app/01-sonataflow-greeting.yaml -n sonataflow
You can follow the workflow deployment by running
kubectl -n sonataflow get workflow/greeting -w

NAME       PROFILE   VERSION   URL   READY   REASON
greeting             0.0.1           False   WaitingForBuild
Configuring the Ingress Route
Once you deploy the SonataFlow workflow you can configure and deploy the APISIX Route.
Open the file workflow-app/02-sonataflow-route.yaml in the example application you cloned earlier and change the credentials for the apisix-ingress client that you created in the Keycloak server:
apiVersion: apisix.apache.org/v2
kind: ApisixRoute
metadata:
  name: sonataflow
spec:
  http:
    - name: greeting
      match:
        hosts:
          - local.greeting.sonataflow.org
        paths:
          - "/*"
      backends:
        - serviceName: greeting
          servicePort: 80
      plugins:
        - name: openid-connect (1)
          enable: true
          config:
            client_id: apisix-ingress
            client_secret: (2)
            discovery: http://keycloak.keycloak.svc.cluster.local:8080/realms/sonataflow/.well-known/openid-configuration
            scope: profile email
            bearer_only: true
            realm: sonataflow
introspection_endpoint_auth_method: client_secret_post| 1 | The OpenID Connect plugin to make the Ingress connect to Keycloak |
| 2 | The apisix-ingress client credential to be changed |
Open the Keycloak server (http://keycloak.keycloak.svc.cluster.local:8080) and in the realm sonataflow click on Clients, and then on apisix-ingress.
Click on the tab Credentials and copy the Client Secret:
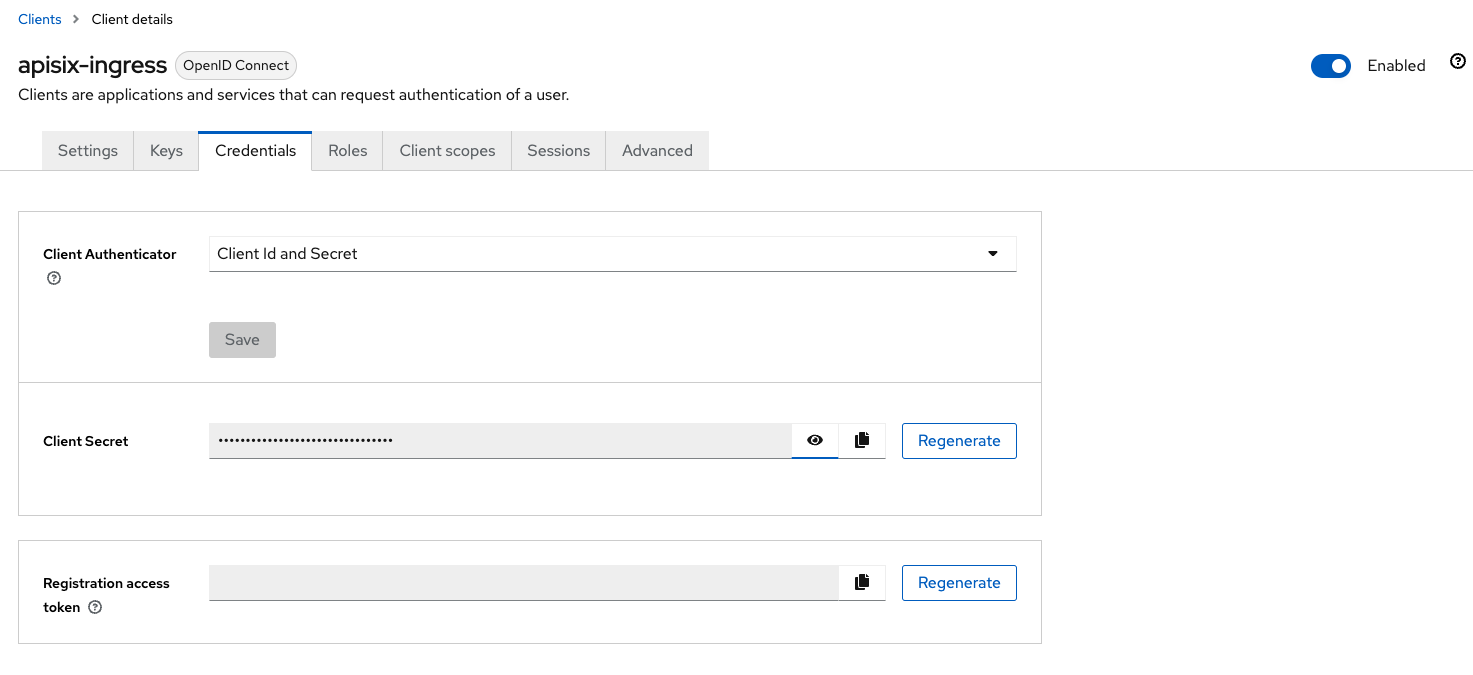
Paste the Client Secret into the ApisixRoute file workflow-app/02-sonataflow-route.yaml in the example application and run:
ApisixRoutekubectl apply -f workflow-app/02-sonataflow-route.yaml -n sonataflowTo this point, you have installed in your cluster the Keycloak and APISIX Ingress server, and deployed the example Greeting workflow application.
Accessing the Workflow
Access the workflow without a token to see a rejection:
INGRESS_URL= (1)

curl -v POST ${INGRESS_URL}/greeting -H "Content-type: application/json" -H "Host: local.greeting.sonataflow.org" --data '{ "name": "Luke" }'| 1 | The ingress url is accessible via the Minikube service command. If you have not done it already, run minikube service apisix-gateway --url -n ingress-apisix. |
See a 401 HTTP Status message denying your access to the workflow.
Next, access the application using an access token. First, you need to get the access token from the Keycloak server:
CLIENT_SECRET="secret from apisix-ingress client" (1)

ACCESS_TOKEN=$(curl \
  -d "client_id=apisix-ingress" \
  -d "client_secret=${CLIENT_SECRET}" \
  -d "username=luke" \
  -d "password=luke" \
  -d "grant_type=password" \
"http://keycloak.keycloak.svc.cluster.local:8080/realms/sonataflow/protocol/openid-connect/token" | jq -r .access_token) (2)| 1 | Copy the secret from the apisix-ingress client |
| 2 | Request an access token from the Keycloak server using the user luke credentials |
|
The token returned with the command above has a default timeout of 5 minutes, which means that if you take too long to use it, or want to execute several requests, you might need to execute the command again and get a new token. |
Having the access token set in an environment variable, access the application again:
INGRESS_URL= (1)

curl -v POST ${INGRESS_URL}/greeting -H "Content-type: application/json" -H "Host: local.greeting.sonataflow.org" -H "Authorization: Bearer ${ACCESS_TOKEN}" --data '{ "name": "Luke" }'| 1 | The ingress url is accessible via the Minikube service command. If you have not done it already, run minikube service apisix-gateway --url -n ingress-apisix. |
This request is passing through the APISIX Gateway, which is validating the token via the Authorization: Bearer header. Then the request is passed internally to the workflow application which process and return to the original client.
Finally, this time, in the last part of the command output, you should see a JSON document similar to the excerpt below, which indicates that the workflow instance was created successfully.
{"id":"a9fc1a97-e274-4e40-80e5-4ff5ba203231","workflowdata":{"message":"Hello from YAML Workflow, anonymous"}}Conclusion
In this guide you were able to deploy an architecture of services capable of authenticating a valid user using OIDC mechanisms. Now, everytime that someone needs access to the deployed workflow, it must first get a valid JWT token in the Keycloak OIDC Server.
Next steps now, would be to tailor this architecture for your needs such as a cluster of Keycloak servers behind a TLS and valid domain. Also, APISIX Ingress offers many other capabilities and configurations that can be tuned to favor your use cases.
Found an issue?
If you find an issue or any misleading information, please feel free to report it here. We really appreciate it!